Asus router secrets. Wi-fi router Asus RT-N12: setting up a connection to a computer
ASUS is a well-established manufacturer of high performance electronics, including modems for Internet access. But any device of this type needs to be configured to the parameters of the provider with which the contract for the provision of communication services has been concluded.
This instruction will give you an answer to the question of how to configure the asus rt g32 router, while it is worth remembering that the configuration algorithm and device interface from the same supplier are very similar, so the article will be useful to all buyers of ASUS modems with Wi-Fi support.
Preparing for setup
The technical preparation of the router for configuration is carried out in several stages:
- Connect the power supply to the Asus rt-g32 and turn it on to the power supply.
- Connect the Ethernet cable provided by your ISP to the modem port labeled WAN.
- Connect the port of the router with the inscription "LAN1" to the network card of the computer using the Ethernet cable that is included with the Wi-Fi modem.
- Reset the Asus rt g32 to factory settings by pressing and holding the "Reset" button recessed in the case for ten seconds.
Computer settings
Often, the characteristics of a computer's network card are manually configured for other connections. To work with a Wi-Fi router asus rt g32, you need to configure the card:
1. Open the OS network settings section. For example, for Windows 7, you need to open the settings window shown in the following figure (located in the control panel), where you can click on the highlighted link.

2. Go to the properties of the connection by right-clicking on its icon and selecting the appropriate item from the menu that appears.

3. Open the "Properties" of the item indicated in the following figure:

4. Set the values of the protocol characteristics, as shown in the figure:

Repeat the procedure for other connections, if any.
Setting up a router
To configure the asus rt-g32 for your provider's settings, follow the steps of the following instructions:
1. Launch any browser, enter the address 192.168.1.1 and go to it.
2. In the authorization dialog that has loaded, enter "admin" in both fields and click on "Submit"

3. Click on the button "Go to the main page"

4. The software shell of the Wi-Fi router asus rt g32 supports Russian, select it in the "Language" field.

5. To configure WAN access options, click on the “WAN” main menu item.
6. Check with your carrier for connection type.

7. If the provider provides the Internet using dynamic IP technology, then nothing needs to be changed on the WAN page. Click on the "Accept" button.
8. If the Internet is provided using static IP technology, then in the “Type of WAN connection” item, select the appropriate type and fill in all the form fields with the data received from the provider and click on “Accept”.

9. When choosing the PPPoE connection type, specify the receipt of the IP address automatically or fill in the address field if it was provided by the Internet provider. W fill in the fields of the "Account and connection settings" section with the data specified in the contract for the provision of communication services, and in the MTU field enter the value 1472 and click on "Accept".


11. Apply the changes and configure the wifi module for wireless connection. If this option is not needed, restart the modem and use the Internet.
WiFi setup
To configure the characteristics of wireless access to the global network, open the tab of the main menu "Wireless Network". Where you set the following options:
- In the "SSID" field, enter the name of the Wi-Fi network displayed on subscriber devices. It can be arbitrary, but must consist only of numbers, signs and letters of the Latin alphabet.
- Enable the "Hide SSID" option if you want to use this method to protect your wifi network from unauthorized access. When activated, the setting hides your network from subscribers, and you can connect to it only by knowing its exact name.
- Set the Authentication Method to WPA-Personal. And in the "WPA Encryption" line, select "TKIP". These are the most well-established and widely used network protection methods.
- The "WPA Preshared Key" line contains the password that users must enter when they log in to your wifi network. The length of the code combination must be at least eight characters; any characters are allowed.
- Click "Apply" to fix the settings.

This completes the setup of the asus rt g32, it remains only to reboot it and use the Internet, both via a wired interface and via Wi-Fi.
Found a typo? Select the text and press Ctrl + Enter
Recently, wireless networks have become an urgent need in many homes. This is especially true for those who use laptops, tablets, smartphones and other portable devices to access the Internet. Agree to burden these devices with a wire, somehow ... at least inconvenient. And it will be convenient for you if you sit comfortably in your favorite armchair or on the sofa and from there you will surf the Internet from your tablet or laptop. In order for all this splendor to come true, you will need a Wi-Fi router, and the knowledge of how to set it up. There are a lot of routers in our time, but among them the most popular are ASUS, TP-LINK, D-Link, Linksys and ZyXEL routers. In this tutorial, you will learn how to set up an Asus router.
1st step
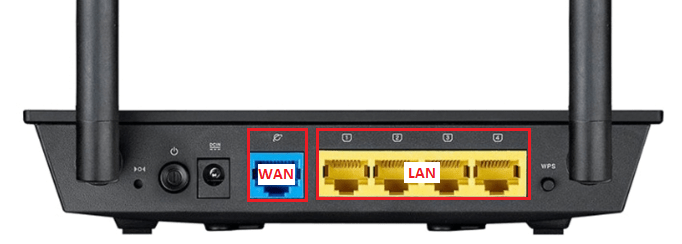
Connect the router as shown in the picture. The yellow WAN cable is the cable through which the Internet comes to your house. LANs are ports for connecting your computers with a cable.

2. step
Go to your computer, in the network settings of the TCP / IP protocol. This can be done from the menu. "START > Settings > Control Panel > Network Connections". In the window that opens, right-click on the active connection and select "Properties".

In the network settings window, select the "Internet Protocol TCP / IP" item and click the "Properties" button

In the TCP/IP protocol settings window, select "Obtain an IP address automatically".

3. Step
Launch the browser and enter in the address bar: http://192.168.1.1 (this address is usually set by default for Asus routers). Press Enter and enter the username and password to access the administrative panel of the router (by default, this is the username: admin, password: admin).

If the login and password request window did not open, or the admin login did not work, then you will need to reset the router settings to the factory settings, usually for this, on the router case, there is a special reset button. If this is not observed, then read the instructions for the device.
4. Step
In the admin panel, click on the item "IP config" and select WAN Connection Type How "Static IP:"

5. Step
Enter network settings ( IP Address, netmask, Gateway, DNS) in the corresponding fields:

6. Step
Now go to the menu item " Wireless"select" Interface", select WPA/WPA2 encryption and enter a password to protect your wireless network from unauthorized access.

7. Step
Save all our settings Save settings"
8. Step
Now on the computer (laptop) in the list of found WI-FI devices, select your Asus device, connect to it. Enter the password your password that you came up with in step 6.
Setup completed.
(11 Votes)
Good day, dear readers. Today we will analyze how to set up the Asus RT G32 router literally on your knee, as experienced uncles and aunts like to say. So let's get started.
As I understand it, we have already bought this router and connected the Internet from your favorite provider. First of all, we need a patch cord (most companies, including Asus, put it in the box with a new router).
General setup of the Asus router
We take our router in pens and proceed to configure it. First, we take out the provider cable from the network card of your computer and connect it to the WAN port on the router, and the new cable to the first LAN port. We plug the second plug into the network card of the computer. This method is used with the Asus RT G32 model, and with any other router or router:

Wiring diagram
Next, you need to configure the receipt of an IP address on the network card. The Asus device will give you the address automatically. Therefore, in Windows XP, we right-click on the tray icon, select the "Status" item, click "Properties" and the item "Internet Protocol (TCP / IP)" - then we need the "Properties" button:

Setting up a network card
In the address bar of the Browser, we type the IP address, which is usually indicated on the back of the router box - 192.168.1.1, as well as the login (admin) and password (admin), which are suitable for any Asus devices. Your RT G32 WiFi router should display the page:

When you turn it on for the first time, Asus suggests not to configure anything:

Automatic setting
We do not agree with the Asus proposal and make the transition "To the main page":

Home settings page
We assign the desired interface language (further, the router settings will be given based on the selected interface language "Russian"). The Asus RT G32 router is mostly configured on the General tab. Different providers use different protocols: PPTP (Rostelecom), L2TP (Beeline). Before the Asus RT G32 router is configured, Rostelecom must issue seven parameters:
- On the "WAN" tab in the "WAN connection type" field, select "PPTP" - there are no parameters here;
- In the fields “Setting the WAN IP address” and “Setting the DNS WAN”, check the “No” box and put in the fields of the above sections the data that your provider gave you (IP address, DNS address, subnet mask, gateway);
- Also enter the username and password as specified in the contract.
- Pay close attention to the section "Special requirements of the Internet service provider": in the "HeaRT-Beat or PPTP / L2TP server" field, specify the parameters that you need to check with your provider by calling the support service. Otherwise, the router will not be able to create a VPN connection in principle. The support service of Asus, that is, the manufacturer of the router, has nothing to do with it. By the way, the router can also be assigned the MAC address of the computer, but not everyone needs this.

configure WAN port
If we talk about L2TP, there will be fewer letters and numbers.
A small example. When, in practice, the Asus RT G32 router was configured, Beeline for some reason said one word! It was the name of the VPN server. Everything is correct: the login and password are specified in the contract, and DNS and IP will be obtained automatically (the "Yes" checkbox in the "2" list).
Setting up a wireless connection
In theory, the Asus RT G32 router works according to the N150 protocol, despite the letter G in its name. So, Asus needs to work on the names. The Asus RT G32 device has the following features:
- On the "General" tab of the main page of the router, select the "Wireless network" item. In the SSID (network identifier) field, specify the name of the wireless connection distributed by the router. You can give the network the name Asus RT G32, but, in general, any name is suitable. In the "Hide SSID" field, check the "No" box.
- Authentication Method - Select "WPA2-Personal". WPA Encryption - Select "AES". This is what we would do with the RT N12 router, and in general with any Asus device where the AES method is implemented.
- Think up and enter a password. The hint on the right speaks of reliability. Your Asus RT G32 router uses up to 8 numbers and letters, but only English.
Leave the rest of the values as default:

Wireless network
Click "Apply". Nothing else is required! We looked at how to configure the Asus RT G32 router so that it "distributes Wi-Fi". Now you need to configure the network card on your PC or laptop. I hope the reader understands that this must be a Wi-Fi card. Turn it on first, and if it is already on, then a notification will appear in the tray that the network has been detected:

Wireless networks detected
The asus RT G32 router is now fully configured. Laptop or computer - not configured. Therefore, you need to click on the new icon and select one connection in the window that appears (for example, Asus RT G32 is the SSID of our router). Having found the desired network, right-click on the name and select the "Security" tab. Set the encryption method and password here:

Encryption method
As you remember, our Asus RT G32 router is configured for WPA2-AES. We choose the same thing here - the network is already working, the router is “distributing” it!
Wireless setup video
Next, we will consider how the Asus RT G32 is configured for specific applications. We will talk about the DC ++ file-sharing network, but not only. Know that the Asus RT G32 router allows you to connect to your computer via RDP (remote desktop). What we will do, and also try to update the firmware ourselves.
How to set up a connection with a DC++ client
When the Internet connection works through a router, such as Asus or D-Link, only it, and not the network card of the computer, is engaged in addressing. The router takes over Internet requests and redirects them to the IP address that it dynamically assigned to the network card. Because of this, some applications, such as the DC++ file-sharing client, have problems accessing the service. Any router has this property, and the Asus RT G32 model will not be an exception. On the router, you need to perform several manipulations - namely, to carry out port forwarding, i.e. configure the network to work correctly with your router, and the router with a computer. So let's get started.
In order to start "port forwarding", you need to find a special tab. In the Asus RT G32 router interface, the WAN menu contains six tabs. Above it was considered how to open the first of them. Study the beginning of the article and follow the steps with the router up to "step 1". It remains to go to the "Virtual Server" tab - this is one of the tabs in the "WAN" menu (on the left side of the window):

Van port setup
In this menu, you can create redirect rules, although Asus has sewn several ready-made templates into its router. Make sure that the "Enable virtual server" box is set to "Yes". Now you can start setting up not the router, but the client.
In the DC++ connection settings, select the "Firewall with manual redirect" mode. In the case of file sharing within the network, in the "External / WAN IP" field, you need to enter the address that is valid for the provider's local network - this address is assigned to the WAN port of the router. If the DC++ client accesses the external Internet, you will need to specify your dedicated IP address (contact your ISP for details).
In the "Ports: TCP and UDP" field, you need to enter the values of the ports on which you plan to continue working with DC++. It is better to choose one value that is easy to remember, but which is not occupied by the system. Use the link:
- Port (TCP/IP)

DC++ setup
After all the steps, let's return to setting up the router - namely, to the Asus RT G32 graphical interface.

Route setup
On the router, in the "Service Name" field, specify the name of our rule - for example, "DC ++" (optional). Then, in the "Port range" field, specify the value of the port from which you want to redirect external traffic to the internal network behind the router. In the "Local IP address" field, you must specify the value of the IP address of the PC in the local network. You can find out this IP address in the “Status” of the connection, and you will specify the same numbers in the Asus RT G32 settings:

We look properties
In the "Local port" field, you will specify the port value that is configured on the computer (the port in the DC++ client). In the "Protocol" field on the router, you must specify which type of traffic (TCP, UDP or all at once) will be used. We select the option "BOTH", which means BOTH. In this case, the router will create two rules, for TCP and UDP. You can enter any number in the "Protocol number" field - the option does not affect anything. This is true for all routers in principle, including the Asus RT G32.
To enable remote desktop operation, the router is configured in the same way as for a computer with a DC ++ client. But in the "Local port" field on the "Virtual server" tab, a specific value is indicated - the port number on which the RDP protocol works. This, of course, is about TCP port 3389 - it is used by default. And the router will not be able to interfere with RDP protocol services.
We flash the router ourselves
What is the firmware of the router, everyone knows, but who does not know, he at least guesses. Firmware is a special program that helps any device, in this case a router, work. Updating the firmware is then required to improve the performance of the router, fix hidden errors, etc. All companies, including Asus, are constantly developing their software, which is necessary for the development of the functionality of technology. For the Asus RT G32 device, the firmware is on the Asus website. No need to download "pirated" drivers and firmware hacked by homegrown hackers. Whoever bypasses this ban will get an unpleasant effect - overheating. True, the Asus RT G32 router is designed without errors - it does not overheat even with "pirated" software. The firmware version of your router can be found in the web interface. Open the interface, as discussed - Asus has placed all the information at the top of the page:

Additional settings
Knowing all the numbers, that is, the firmware version, we can either download and install a new one, or leave the old one. You also need to find out the hardware revision of the router - Asus prints the letters C1 or B1 on a sticker. There are no other revisions for the RT G32 model, and the firmware for them is available on the Asus website:

Download page
The Asus website suggests choosing an operating system. I think you know what operating system you have installed, pay attention to the bit depth (32 or 64). After that, a window will appear in which you have to select the firmware version. Remember the numbers indicated in the router interface:

Downloading the required file
After downloading the new firmware, you need to install it. On the main page, select the "Administration" item and the "Firmware Update" tab. At the bottom, next to the "Program Version" field, click on the "Browse" button and select the Asus file that you downloaded. In the window that appears, click "Open" and then click "Submit":

We update the software
The installation of new firmware on your router will begin:

Update process
Attention! While the firmware is being “filled in”, the router itself cannot be turned off, otherwise it may end badly. Namely, the Asus firmware will not be installed correctly, and the router will not work correctly. For the Asus RT G32 model, error protection is provided, but it is possible to get a “brick” instead of a router at the output. When the firmware is uploaded, it is best to wait about two minutes and restart the router forcibly: Asus devices have a “Reset” button on the back panel, which is “drowned”, and now you need to hold it down for 5-6 seconds - the router will go out and restart.

reset button
The setting is 100% complete. For the Asus RT G32 router, the characteristics are selected so that you can use this device both at home and in the office: any LAN port can be used as a WAN port, but, alas, not with Asus proprietary firmware. Most routers from the Router RT family do not even differ in this property: the WAN port will burn out, and - hello, you kind of lose the functionality of the router and get an "access point".
Asus is not the only company that produces routers with the ability to replace LAN-WAN. You need to look at the chipset model - for Ralink RT3050F and RT3052 microcircuits, the possibility of substitution is provided. Let's name all models of routers with one of these chipsets:
- Asus RT G32 of both revisions;
- Non-Asus: D-Link DIR-300/NRU routers (B1-B4), also DIR-615 (D1-D4);
- Router DIR-620 (revision unknown).
Asus firmware cannot be installed on a D-Link router. The reverse is also true. But "pirated firmware" works on all routers: Asus does not overheat anything, which cannot be said about D-Link devices.
Imagine: hurrying to work in the morning, you went to the kitchen to have breakfast. Turn on the kettle, and he will answer you: “The device cannot perform this operation. Please update the firmware! Turn on the toaster and hear: “The software is out of date. Install the update!”…
The day is not far off when everything that surrounds us will be connected to the Internet, and it is time for us to prepare for this. How? Well ... first, let's learn how to configure a router (router) - a gadget that connects devices to a local network and provides them with Internet access. Today I will tell you how to set up a router using the example of a typical Asus RT-N12 D1 home segment model.
How to set up a router: instructions on the example of Asus RT-N12 D1
First power on
So here it is, brand new and shiny, fresh out of the box. The first thing experienced users do is install the latest version of firmware (firmware), which maximizes the potential of the device. Firmware for other models must be taken only on the manufacturer's website! Otherwise, your router may turn into a horned "brick".
Upgrade Procedurefirmware:
- Download the firmware to your computer and unpack the archive.
- Connect the power supply to the router and connect it to the mains, then turn on the device with the "Power" button.
- Connect the router to the computer using a patch cord (network cable): insert one end into the PC's network card connector, and the other end into any of the device's LAN ports. On the Asus RT-N12 D1, these are yellow sockets 1-4, the blue WAN socket is for the ISP cable.
- Log in to the router's web interface: launch any browser and type 192.168.1.1 (its local IP) into the address bar. In the authentication window, enter: username (username) - "admin" and password (password) - "admin". This information is given on a label affixed to the bottom of the machine.
The data for entering the web interface (popularly often called the "web face") may be different. For example, the network address is 192.168.0.1 or “tplinklogin.net” (on some tp-link models), login with a password is “mts”, “beeline” or something else. The main thing is to know where to look for them - on the factory label on the bottom side of the case of any router. Always.

- The first thing you will see after logging into the Asus RT-N12 D1 web interface and other similar Asus models is the Internet Quick Settings window. We are not interested in it yet, so open the second tab and click on the house icon - this will take you to the main menu.

- Go to the "Administration" section and open the "Firmware Update" tab. On devices of other brands, this section may be called “System” or “System Tools”, and the desired menu item may be “Software Update” or “Upgrade Firmware”.
- At the top of the window is the current firmware version. If the one you downloaded is newer, click the "Choose file" button and specify its location. By clicking on "Submit" next, you will start the update.
Attention! In no case do not interfere with the firmware installation process - do not press any buttons on the device, do not disconnect the network cable, do not turn off or restart the computer.

- When the firmware is installed, exit the web interface and press the "Reset" button on the device case, which will reset the settings.
Setting up an Internet connection (WAN)
Fast auto tuning
- Connect the provider's cable to the WAN port of the router (in my example, this is a blue socket marked with an icon similar to the Internet Explorer logo, on some other models it is labeled "INTERNET").
- Open the web interface. The Quick Internet Setup feature is able to automatically recognize the type of connection. Click in the first window "Go" and do the following:
- Change the settings for accessing the "web-muzzle". Leaving this data as default is not safe.

- Enter the connection login and password that the service provider gave you.

- Give your wireless mesh a unique name and create a network key (password to connect).

This completes the quick settings. Click Apply.
Manual tuning (for experienced)
Ask your provider for the following information:
- WAN connection type.
- Your account name and password.
- The Mac address to which your contract is linked (if the Internet provider does not use MAC identification, then it is not necessary).
- IP address, default gateway, and subnet mask (if you have been assigned a static IP).
- DNS addresses if automatic connection is not used.
- If necessary, other data: VPN server (for PPTP and L2TP connections), pppd parameters, service name, access concentrator, etc.
Go to the main menu "web faces" and in the section " Additional settings» click « Internet". The main WAN settings are on the tab " Are common».

First of all, in Main parameters» Set your WAN connection type. The rest is “Enable WAN, NAT, UpnP”, leave it as it is, if the provider has not specified anything about this.
IN " At a construction siteIP addressesWAN» Leave the value "automatic" if you have not been issued a static IP, which is an additional paid service.
« DNS WAN” Also leave automatic or mark “No” and enter manually. For example, public from or .

IN " Account settings» Be sure to enter your username and password. The rest - according to the circumstances.

IN " Supplier's special requirements”, if necessary, write down the VPN address, host name and Mac specified in the contract. Click Apply.

Setting up a wireless network (WLAN)
In chapter " Wireless network"The most basic is also on the" General "tab.

- SSID– WLAN name. You can give any.
- BroadcastingSSID- determines whether gadgets with Wi-Fi will see your mesh in the list of available connections. If you mark " hideSSID”, then some devices will not be able to connect to it.
- Wireless network mode. The optimal one is “Auto”, it allows any 802.11b / g / n devices to connect to the router without speed limits.
- Broadcast channel width. The default is 20/40 MHz. To maximize bandwidth, set to 40 MHz. With frequent failures and breaks in communication, reduce to 20 MHz.
- Channel(1-13) on which the transmission takes place. If the connection is consistently good, leave the default selection. With frequent breaks, you can sort through the channels and stop at where there are the least problems.
- Option " Extended Channel» allows you to use an additional channel when working in some modes.
- Authentication and EncryptionWPA ensure data security during transmission. Optimal - WPA2-Personal and AES.
- Preshared KeyWPA– a sequence of any characters, from 8 to 63, which will be used for encryption.
- Key rotation interval– after the number of uses specified here, the key must be changed. You can put 0.
For those who have never set up Wi-Fi, all this may seem complicated. To make life easier for beginners, a technology was invented Wireless WPS. It allows you to transfer wireless network settings from a Wi-Fi adapter to a router literally “over the air”.
On the back of the Asus RT-N12 D1, if you notice, there is a "WPS" button. On some older devices, it may be called "QSS" or "EZSetup". So, to transfer the settings, just press this button first on the router, then on the adapter and wait a couple of minutes.

Set up a local area network (LAN)
Attention! If you do not understand the purpose of these parameters, leave them as they are!
The main parameters of the local network are set on the first two tabs of the menu of the same name - " LAN IP" And " DHCP server».
On the tab " LAN IP» indicates the IP of the router in the local network. Here, as you can see, the same address is written on the label, and you can change it (within the available address pool).

Further - "ServerDHCP"(DHCP stands for Dynamic Host Configuration Protocol). If it is enabled, connected devices will automatically obtain IP addresses. If it is disabled and at the same time manual assignment is activated, then, accordingly, they will not.
Also on the "DHCP" tab you can set:
- pool start and end address within a subnet (for example, a subnet allows 256 IP addresses, but for security reasons we will limit them to the number of network devices that we have at home);
- IP lease time;
- the main gateway (in some cases, the IP of the provider's gateway is prescribed here);
- IP DNS and WINS servers (the latter are used in NetBIOS-based network structures);
- IP and Mac addresses of hosts that bypass DHCP (with manual IP assignment).

Most home users find it more convenient to keep the DHCP server enabled, that is, do not change anything in this section.
Firewall
A firewall is the protection of an internal network from external intrusion by filtering incoming and outgoing traffic. Filtering is carried out according to the rules that the administrator creates. It is recommended to enable it if you are not sure that all your gadgets are securely protected by a software firewall.

On the tab " Are common» produced:
- enable/disable firewall;
- activation / deactivation of protection against DoS attacks (optimal value - yes);
- selection of the type of registered packets (lost, accepted, both types or absent);
- permission/prohibition to respond to ping requests from the Internet (optimally - no).
On the tab " FilterURL» indicate the addresses of sites that you want to block.

« Keyword filter» will exclude loading pages where these words occur.

« Network Services Filter» prevents the listed hosts (clients) from accessing certain network services. Uses 2 types of filtering - blacklist and whitelist.
- Hosts from the black list are denied access to the specified services, while others are allowed.
- Whitelisted hosts are only allowed to access the specified services. The rest are prohibited.
Here you can also set the rule duration.

General menu
Finally, let's go over the sections of the "General" menu.
Attention! If the purpose of the option is not clear to you, it is not recommended to reconfigure it!
- "Network Map"- Displays current LAN and WAN connections, Wi-Fi security settings, router and client information. Allows you to change individual settings, such as encryption options, network key, etc.

- "Guest Network"- allows guest Wi-Fi networks to use the router to access the Internet, but prohibits access to LAN resources.

- "Traffic Manager" allows experienced users to manage QoS - a technology for distributing network resources depending on the type of traffic and the set priorities. For example, voice traffic is given more bandwidth and higher priority than other traffic. Works in automatic and custom modes, the first one is enabled by default. Optimally tuned.

- "Parental control". The purpose of this section, I think, is clear to everyone. It makes it possible to restrict certain hosts from using the Internet. For those who find it difficult to figure it out on their own, you can watch the tutorial video.

As you can see, a router is a complex thing and can do much more than just transfer traffic from one network to another. We have considered only the most important options of the Asus RT-N12 D1, and if I dared to describe them all, it would be a very, very long article. But the main thing, I think, we have achieved: now you can configure routers of this type in no time.
This article will cover all aspects related to setting up ASUS routers when connecting to a Rostelecom provider. The points related to the parameters and their connection to the Internet will be described. We will also shed light on all the advantages and disadvantages when choosing routers from this company. An example would be setting up an ASUS RT N12 router for Rostelecom.
Setting up an ASUS RT N12 router for Rostelecom
There are several connectors on the back of the device. Four of them are for connecting other computers and devices to your home network, and the fifth is for connecting your service provider's cord. Parameter setting should be performed from a device that has a direct connection in the network card.
Important: when connecting, check the network settings of the operating system. In the selected section, you will need to set the acquisition of an IP address automatically.
Next, we will deal directly with the installation of the router. There is a sticker on the back panel that contains the IP address, username and key to enter its parameters. To launch the device installation window, you need to enter its address in the browser line. For the company in question, it is the same 192.168.1.1. Next, the router will select the parameters automatically, you just need to fill in a few simple fields. The user will be prompted to change the key to the router settings, then the device will automatically select the type of connection, require a password from the Internet and prompt you to come up with a name and password for your Wi-Fi. This completes the automatic selection of parameters and the Internet should start working. If there is still no Internet, then the information below is especially for you.
Setting the router parameters manually
To perform parameterization manually, select the "Connection" tab and enter the following data:
- WAN connection - PPPoE;
- activate WAN - yes;
- activate NAT - yes;
- enable UPnP - no;
- receive IP automatically - yes;
- automatically connect to DNS - yes;
- enter the login name and key provided by the provider.

The rest of the data should be left as default. If everything is done correctly, then you will already be able to browse the Internet from your computer and other devices connected to the network. If necessary, you can also set up a wireless network.
WiFi setup
In the router interface we find "Wireless networks" - "General" and set:
- hide SSID - no;
- SSID - enter the name of your Wi-Fi network;
- Wi-Fi network mode - auto;
- channel width 20/40 MHz;
- channel - 7;
- extended channel - auto;
- WPA key - come up with a password for your Wi-Fi network;
- authentication method - WPA-Personal;
- WPA-AES encryption.
After that, save the settings and exit the router interface. Checking the internet connection. Next, consider a number of problems that usually occur when setting the parameters of this device.
Setting up the ASUS RT G32 router for Rostelecom is practically no different from installing the previous one, but there are a few things you should know. If you should select WPA2-Personal. Also, when installing the router itself, you will be prompted to select a port. If there is television from this company, we select the same port.

Configuring ASUS DSL N10, RT N10P and RT N 10U routers for Rostelecom
Since the above three devices belong to the same family, their setup is no different from each other. We connect the wires in the same way as on the RT N12, after which we proceed with the installation. We enter the same IP address in the browser line. And in general, the parameters of these models do not differ much from the previous ones. We will be prompted to set the time zone, select "GMT + 02.00 South Africa, Greece, Ukraine, Romania, Russia, Turkey".
When prompted to select a provider, select Others. In the settings window that opens, set the same configurations as described above. As you can see, setting up ASUS routers for Rostelecom is not particularly difficult, you just need to follow the instructions clearly.
Important: when setting up the ASUS RT N10P router for Rostelecom, you should take into account its not too high data transfer rate. Therefore, if the load on the router is more than 1 device, we recommend purchasing another router.
Possible problems and their solution
 If the computer reports that it is not possible to access the Internet, we perform the following steps. It is necessary to set the wireless network settings on the computer to the same ones that you specified when parameterizing the router.
If there is Wi-Fi, but no Internet access, go to the settings and check if there is a connection to Rostelecom. If not, restart your router. If the problem persists, contact your ISP.
Advantages and disadvantages of ASUS routers
The undoubted advantages of the products manufactured by this company include high signal quality without failure, good connection speed, even when three or more devices are connected, an ergonomic interface when setting up. Also, almost all models have an excellent design that will successfully fit into the interior of any home.
The downsides are the short cable on most devices and the slightly overpriced price. However, the high price is not set for all models. For example, the ASUS RT N 10U router costs only 500 rubles and is also ideal for setting up a network from a provider such as Rostelecom.
Thus, its main function - high-speed Internet connection of the model of the company in question performs perfectly and their advantages significantly cover the disadvantages.